Are you getting a ‘Kernel-mode heap corruption’ blue screen error on your screen? Don’t worry; it’s a common error. It isn’t that difficult to solve, as well.
What is Kernel-mode Corruption Error?
When the allocator’s view of the heap is damaged by a program, this corruption happens. It is a BSOD error and has reportedly crashed the system of a lot of users.
Causes of Kernel-mode Heap Corruption-
- One of its causes is corrupt or an outdated device driver.
- Insertion of the video card in the wrong PCIe lane- Sometimes, users put the video card in the right PCIe lane. If you have done the same, it might have resulted in the heap corruption.
- Compatibility issue of Graphic Card- Sometimes, when you don’t place the graphic card properly or if it has compatibility problems, it might become the cause of this kernel-mode heap corruption. Check your Graphic card. The solution might lie there only.
- Reduction of the memory clock speed to below factory clock speed by your NVIDIA card. It is also one of the causes of kernel-mode heap corruption error.
How Do I Fix Kernel Error In Windows?
There are two ways to fix Kernel error in Windows-
Quick Solutions 1: According to the second point mentioned in the causes, if you have placed your video card in the wrong PCIe lane, this error might be a result of that. So the correct placement of the Graphic Card will solve this problem. If this does not help, then follow the steps given below-
Quick Solutions 2: – Resolving the kernel mode corruption error using Smart Driver Care. Follow the steps given below-
Step 1:- On your Windows, Download, and launch Smart Driver Care.
Step 2:- Now, let the driver updater utility detect faulty drivers. For that purpose, you need to click on the ‘Start Scan Button Now.’ The step is demonstrated as follows-

Step 3:– After the completion of the scanning process, you’ll notice the Smart Care Device lists all the corrupted, missing, faulty, and outdated graphic drivers. If you have a registered version, click on the ‘Update All’ button and update them manually.
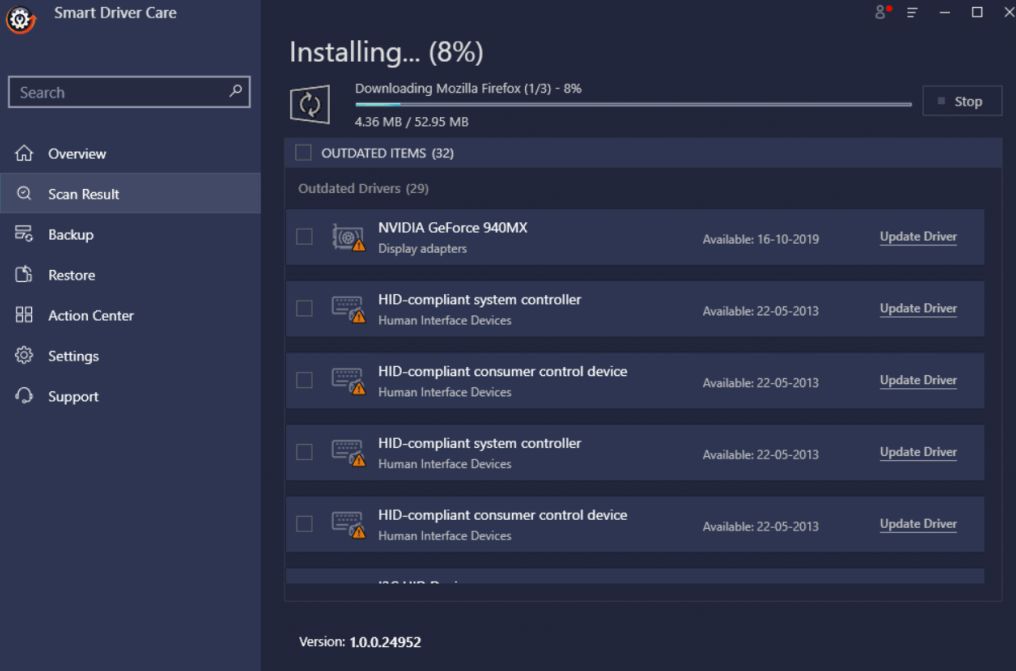
Smart Driver Care will take a few minutes to install the latest versions of all your device drivers.
And you are done with the process. Cheers!
Related Solutions for Windows: Fix Error Code 10 (This Device Cannot Start)
Fix Kernel Mode Heap Corruption Error in Windows 10
There are three ways to fix a kernel error in Windows 10. The solutions are as follows-
Method 1: Fixing the Software Incompatibility issue
Following are the steps to fix the software compatibility issue-
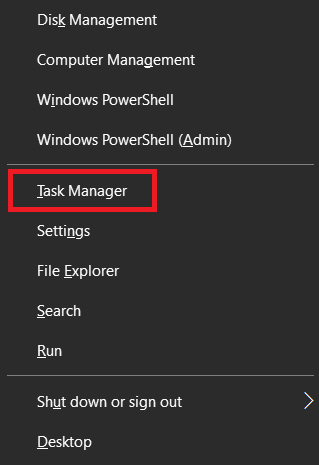
Step 1: Firstly, ‘Press the Windows and X key altogether.’ A list of few options will appear on your screen. Choose Task manager from that list.
Step 2: Now click on the ‘Processes’ tab and if you wish to close any program, choose those programs and then click on the ‘End Task’ button. If the error is still occurring, one by one, you need to restart each Windows program so that you’ll come to know which program is causing the kernel error.
If this does not work out, don’t panic. We have covered another method for you.
Method 2: Fixing Files of the Corrupted System
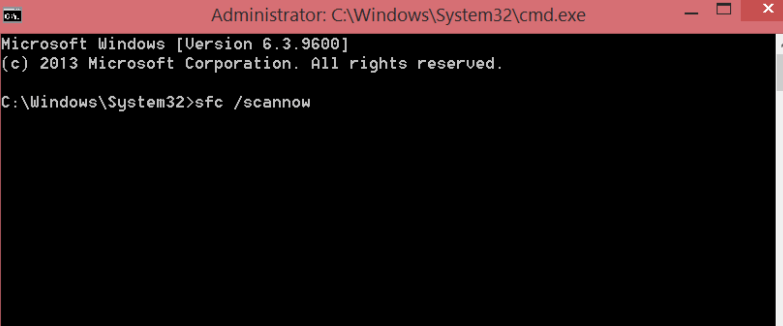
Step 1: Open ‘Command Prompt’ on your Windows. Run as Administrator.
Step 2: One by one, type the commands which are given below. They will automatically fix corrupted and damaged files.
First command line- sfc /scannow
Execute the second command line by hitting the ‘Enter’ button.
Second command line- Dism /Online /Cleanup-Image /RestoreHealth
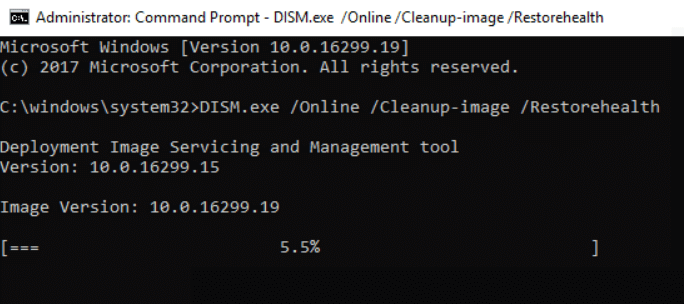
Once again, click on the ‘Enter’ button. Wait till the scanning process gets completed. Close the window. This marks the end of this process.
Method 3: Resolving the problems related to hardware
Simply by resolving hardware-related problems, you can get fix the kernel-mode heap corruption error. The steps are given below-
Step 1: First of all, launch the Run Window. Then type ‘mdshed.exe’ in the empty field similar to the demonstrated picture provided below.

When you click on the ‘Enter’ button, two options will be presented in front of you-
1) Check for problems next time I start my Computer or Check for problems
2) Restart Now
If you want to check quickly and fix the hardware problems, Click on the first option. It will act as a time-saver.
All the potential errors that need immediate action will be run and displayed in its details by the Windows Memory Diagnostic Tool when you will choose the desired option. Restart your laptop/PC for implementing the changes.
Here’s a ‘BONUS‘ tip for you- With the number of hackers increasing with each passing day, it has become important to run an ‘Anti-virus’ software to keep your system protected. If you are using one, great, and if not, then you must.