If you have a Windows 10 setup and you are looking for something fast and reliable to back up the data in your computer system, then Robocopy is one adequate solution for you. In general, you can use external storage to copy and move the files to another computer, or you can go ahead with the data backup using the File share. You can opt for all the standard options, including File Explorer, and they will work, taking a considerable amount of time.
Still, if you are looking for something faster and reliable, then Robocopy is a convenient option for you. Here in this post, we will talk about Robocopy and how you can use it to back up your computer system’s data. Let’s find out.
What is Robocopy?
Robocopy or Robust File Copy is a command-line contrivance into the Windows 10 operating system. It is an exceptional file and directory copy command and used in the command line of the Windows OS. It came to be the particle of Windows Resource kit alongside Windows NT 4.0. Since the disembarkation of Windows Vista, it became a recognized part of Windows. Robocopy command is quite distinctive compared to the customary copy and xcopy controls that come with the Windows operating system.
The reason Robocopy is more convenient than other commands and it is contrived to be more upfront in emulating or copying the folder and directories of any particular size. While copying the files or directories, Robocopy makes sure that all peculiarities, time stamps, properties, and NTFS ACLS are copied. However, it doesn’t copy these files by default, and you need to set up the security information. Robocopy also offers a “resume copy” feature, enabling you to copy large amounts of data files over the network efficiently. Some of the vital copy options available with the Robocopy are:
- /S – Copies the subdirectories, rule out the void ones.
- LEV:n – Copies the higher “n” levels from the derivation.
- /Z – Re-booted mode.
- /B – is used for the Backup mode.
- /ZB – Re-startable mode; always backup mode.
- /SEC – Command is used to copy with security.
- /COPY ALL – Covers all file details while copying, including security-related information.
How to use Robocopy?
If you want to copy the data or files between two computers using the Robocopy, it is essential to authorize the source device’s file-sharing. To start configuring the file sharing on Windows 10, follow these steps:
Step 1. Open the “File Explorer” on your Windows 10 and then move to the folder or files you require to be relocated.
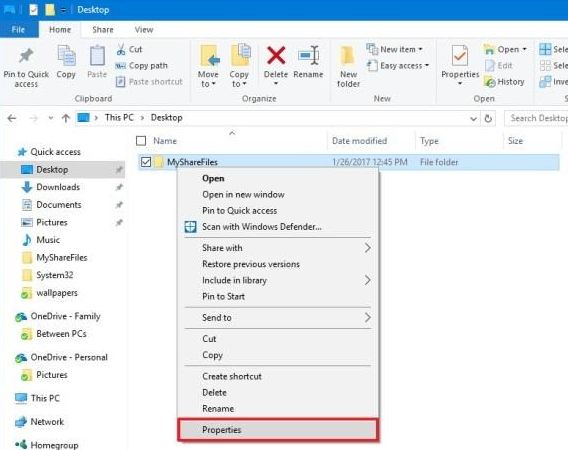
Step 2. Press right-click on the folder and select “Properties.”
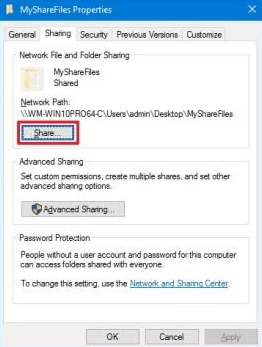
Step 3. After opening the “Properties,” click on the “Sharing” tab and then click on the “Share” button.
Step 4. Select the user or group to share the data or select the “Everyone” group.
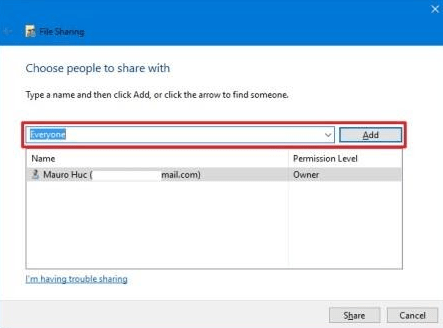
Step 5. Click on the “Add” button and then choose the sharing permissions you want for the file, i.e., “Read” or “Read/Write.”
Step 6. Click on the “Share” at the bottom and note down the network path for the folder so users can access the data over the network, and then click on “Done.”
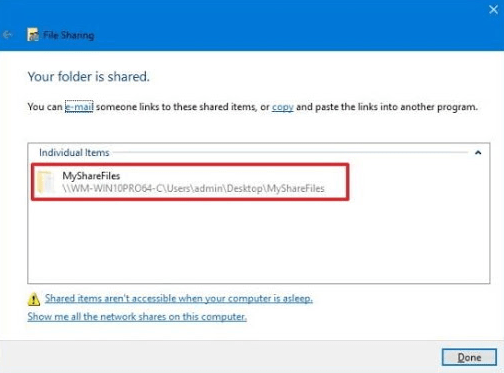
Step 7. Finally, click on the “Close” button at the bottom, and after completing the procedure, note down the folder path and IP address of the source computer.
If you want to see your IP address, you can open the Settings> then select Network & Internet and then click on Wi-Fi or Ethernet options and then click on the connection. There you can view your IP address along with the connection details.
Related Article: How To View Saved Passwords in Chrome on Windows
How to use Robocopy to backup all data on Windows 10?
Robocopy allows you to transfer the files in a faster, secure, and convenient way. Please follow these steps to backup all your data on Windows 10.
Step 1. Open the “Start” menu and type “Command Prompt” in the search bar.
Step 2. Press right-click the result on top and select the “Run as administrator” option from there.
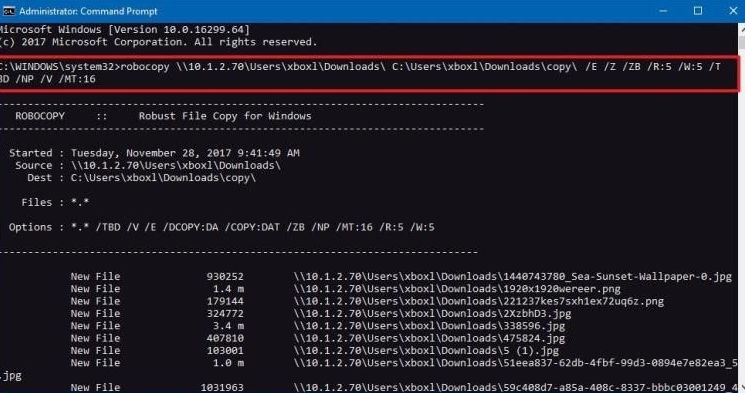
Step 3. Type the below-mentioned command to copy the data or files over the network, and then press “enter,” ensuring changing the source and destination path on your configuration.
robocopy\\source-
device-
ip\path\to\share\folder
C:\destination-
Device\path\to\store\files
/E /Z /ZB /R : 5 /W : 5 /TBD /NP /V /MT : 16
Robocopy Commands
Here we will tell you about some of the essential commands you can use while you back up the data from your computer.
- /E – Copy subdirectories, along with the empty ones.
- /R:5 – Retry 5 times. You can designate a variant number in here.
- /W:5 – Wait for 5 seconds before retrying. You can designate other variant numbers, and the default one is 3o seconds.
- /TBD – Wait for share names to be delineated.
- /NP – No Progress, forbiddance of copied percentage details.
- /V – Produce verbose output, showing miss out files.
- /MT:16 – Do multithread copies, including n threads.
Out of all these commands, the essential one is /MT. By using this feature, Robocopy can copy the data in a multithreaded mode. If you don’t set the number while applying the /MT feature, it will copy 8 files at a time, but if you want to modify the numbers, you can go ahead up to 128 threads at one single time.
Conclusion
Robocopy is a better method rather than using the File Explorer or any other backup medium. It allows you to copy multiple files along with security at one time. If you are looking for a convenient and reliable method to create a backup for your PC, we suggest you go ahead using the Robocopy. Please go through all the details and information in this post before you start creating the data backup. After using Robocopy, you will see how fast and secure your data backup is going to be. We hope that we have guided you well in using the Robocopy file transfer procedure and that our post was the right source of information for you. Thank you for reading.