A keyboard is one of the most important peripheral components of a computer system. With the advent of technology, keyboards have also been advanced in their looks, functionality and compactness. One such keyboard is Logitech keyboard which is a kind of a wireless keyboard changing the over user experience.
Just like a wireless mouse, these wireless keyboards are compact, easy-to-use and durable. But sometimes people come across a situation where installing such keyboards becomes a cumbersome process. Therefore, in this article, we are going to discuss the stepwise procedure with other tips & tricks for your help. Apart from that, some helpful facts would also be shared here.
So without any further delay, let’s get started…
Install Logitech Keyboard on Windows 10
Logitech keyboard is a type of keyboard with the full size keyboard layout and touch mouse pad in the compact. They come in various models and types. Their curve keys are ideal for the frequent keyboard users like typists etc and the soft stroke it offers makes it a noiseless keyboard.
The adjacent touch mouse pad provides users with the familiar yet improved scroll & navigation feel. Left and right-click buttons are also provided with the mousepad for giving all the control to your fingertips.
Method 1: How to install Logitech Keyboard on Windows 10?
Logitech keyboards can be connected and used with your system by using the stepwise guide as given below:
Step 1: First of all connect the unifying receiver (provided with the keyboard) into the USB port of your system.
Step 2: Pull to remove the yellow battery tab on your Logitech keyboard.
Step 3: Now make sure that your Logitech keyboard is turned on. The on/off button would be somewhere at the above section of your keyboard.
Step 4: If something is done correctly, your keyboard is ready to use. Just like traditional keyboards, you can access all the functionalities in this keyboard as well but with better user experience.
Also Read: Fix Windows 10 Black Screen With Cursor Problem
Features of Logitech Keyboard
Here are some features of Logitech keyboard which sets it apart among other traditional keyboards.
- It modifies the speed of the cursor and also adjusts scrolling.
- Disable and enable keys available for Caps Lock, Insert, Windows Start and much more.
- Shows Caps Lock notice and low battery warning as well.
- You can create custom shortcut keys using it.
- Several gestures tutorial videos are also available for the same.
- You can double-tap on the touchpad for click function and you can also disable this functionality.
- Such keyboards are compatible with both the desktop and laptop computers.
- Compatible with Windows 7 and later OS.
- Easy-to-use with removable & durable battery.
Method 2: Installing New Logitech Keyboard
There is another method to connect or install Logitech Keyboard on Windows 10. Follow the stepwise guide as given below:
Step 1: Click on the windows button on the bottom left corner of the screen or you can press the windows button of your keyboard instead.
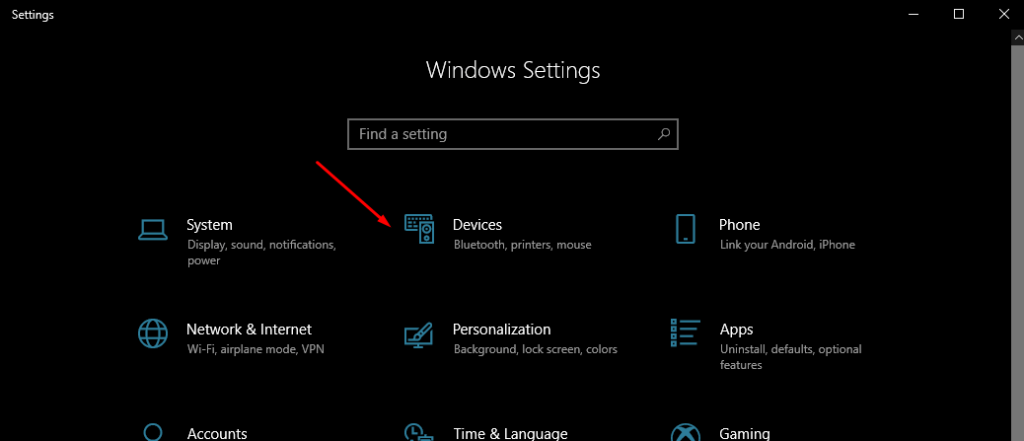
Step 2: Now click on the Settings button at the bottom left panel as displayed.
Step 3: Click Devices which can be seen in the middle of the screen shown.
Step 4: After clicking ‘Devices’, choose Bluetooth & other devices.
Step 5: Turn on the Bluetooth by clicking on the toggle button close to Bluetooth text.
Step 6: Now turn on your Logitech keyboard by clicking on its power button.
Step 7: After a while, your Logitech keyboard’s name must display on your screen under Mouse keyboard & pen.
Step 8: Click on the name and choose Pair. Just in case name isn’t displayed, try turning on and off Bluetooth few times.
Step 9: Once your Logitech keyboard is paired with your device, you are good to go. And your Logitech keyboard is ready to use.
How to download & update Logitech keyboards drivers manually?
In order to download Logitech keyboards drivers manually, follow the steps as given below:
Step 1: Visit the official website of Logitech download page.
Step 2: Type your Logitech keyboard model name in the search box and click on the More button.
Step 3: You can download the drivers from the download section.
Step 4: Select the system as Windows 10 and then locate the driver from the list.
Step 5: Click download to download the respective drivers.
An exe file will be downloaded. Just double click on it and follow on-screen instructions to install the drivers.
Your keyboard is successfully installed.
How to download & update Logitech keyboards drivers automatically?
In order to download Logitech keyboards drivers automatically, follow the steps as given below:
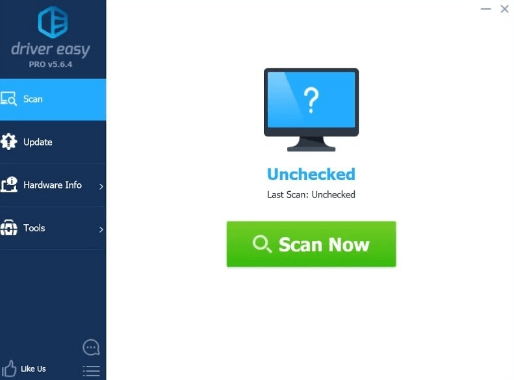
If you are not sure about the drivers to download, you can rather opt for automatic drivers download using Driver Easy. It scans your system, and automatically find the correct drivers for your system.
Step 1: All you need to do is to download and install Driver Easy.
Step 2: Run Driver Easy and click Scan Now. It will detect your system and locate problem drivers.
Step 3: Click on the Update button flagged next to a Logitech keyboard. Or simply click Update All for much convenience.
All the drivers that are either missing or outdated on your system will be automatically installed.
Thanks for reading this guide.