Steam, launched in 2013 by Valve Foundation, is a platform that distributes digital games and related media online. It offers installation and automatic management of software across different computers.
It has a set of tools & services that provides automatic games update and much more. But sometimes users come across Steam needs to be online to update errors.
What is Steam Needs To Be Online To Update Error
Steam is the go-to digital store for all gamers around the world. Currently, it is used by major companies like EA’s original store and Windows Store. But sometimes it tends to generate an error – “Steam needs to be online to update.” If you have also been there, don’t worry, we have got solutions for you.
Reasons for Steam Needs To Be Online To Update Error
Before moving on to the solutions to fix this error, let us first have a look at some possible reasons behind it.
- Any antivirus software is interrupting its working.
- Internet connectivity issue.
- Steam needs reinstallation due to some unexpected internal error.
- The Internet Explorer proxy setting is enabled.
- Some conflicts with DNS settings.
After knowing some common reasons behind the occurrence of this error, let’s get down to the methods of resolving the same.
Method 1. Check firewall settings or disable it
Antivirus software sometimes hinders the working of the Steam app. It marks some of its processes as malicious and therefore blocks it. But it is tedious to find out the particular process firewall is blocking. If you have antivirus software, simply disable the firewall to resolve the error.
Method 2. Check your internet connection
When the above method doesn’t work out, you should check the Internet connection. You may be using a buggy or slow Internet connection, which led to this Steam error.
Method 3. Reinstall Steam
When the above two methods do not work out, reinstall Steam to get rid of this error. Follow these steps to reinstall Steam.
1. At first, navigate Start Menu > Control Panel > Programs and Features.

2. From the list of installed programs, choose Steam and tap uninstall/remove.
3. Click Finish to uninstall Steam.

4. Now go to store.steampowered.com.
5. In the top right corner, tap Install Steam.

6. Finally, download the Steam app and install it again.
Method 4. Disable Internet Explorer proxy settings
Go through the following steps to disable the Internet Explorer proxy settings.
Hit Windows + S keys and type Internet Explorer. Choose from the available results.

When Internet Explorer begins, tap Tools in the top right corner. From the menu, choose Internet options.

Now go to the Connections tab and choose LAN Settings.
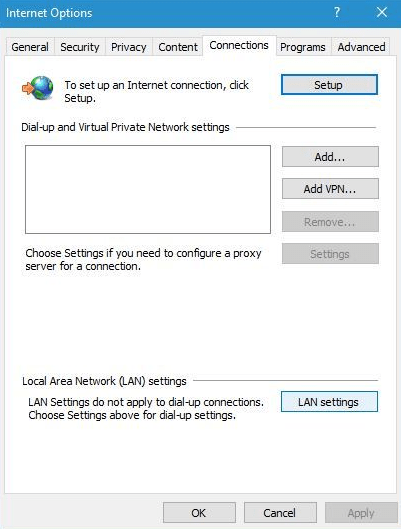
Finally, make sure the option “Use a proxy server for your LAN” is not unchecked. Tap OK to save changes.

Method 5. Use Google’s DNS
This error can be caused due to DNS settings, and so it is advised to switch your DNS to Google’s DNS. Follow these steps to do the same
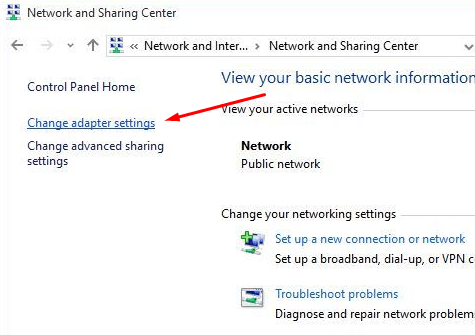
Depress Windows + S keys and type Networking and Sharing Centre.

Tap on the change adapter setting.
Right-click your current network adapter and select Properties.
Next, choose the Internet Protocol Version 4 (TCP/IPv4) and tap Properties.
")
In the general tab, enter the following DNS.
Choose to Obtain IP automatically and also in the second block, select Use following DNS server addresses.
Select Add and enter 8.8.8.8 or 8.8.4.4.
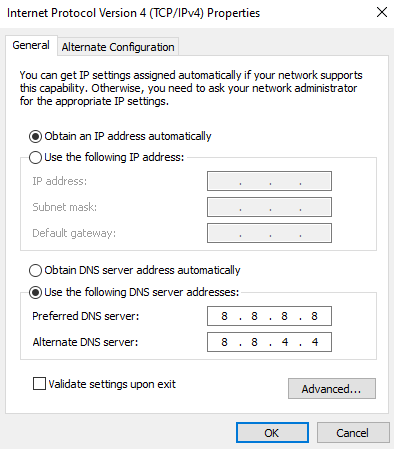
Save changes and restart your network.
The error must be resolved now.
If you are still facing the same issue then comment down below. Our tech experts will help you.