The Windows update service is meant to provide users with updates like service patches/packs to keep an operating system environment up to date. This service automatically scans a Windows system and suggests required updates for the same.
The Windows users can also check the updates on their own by going to the Notification center on their PC or the official website online. But sometimes users encounter Windows update service-related issues as – Windows update cannot currently check for updates because the service isn’t running.
How to Fix Windows Update Service Not Working in Windows 11
In this article today we are going to discuss this issue and how to resolve it with ease. So stay tuned and lighten your headload with our recommended solutions for this issue. Let’s get started…
Why does this issue occur?
This Windows update Service issue usually occurs when a temporary update folder of Windows is corrupted. Let us head straight towards the possible solutions for resolving this issue.
Here are some possible solutions to resolve the issue of Windows update service not running for Windows 7:
Fix 1: By manually starting the update service
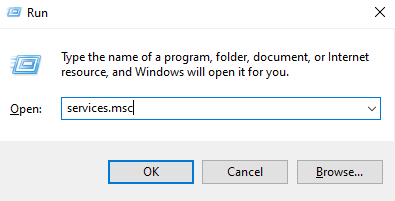
- Hold down the Windows + R key for opening the Run window.
- Next, type the command services.msc and press Enter to open the Service Manager.
- Try to locate the Windows update service and right-click on it.
- Choose Properties.
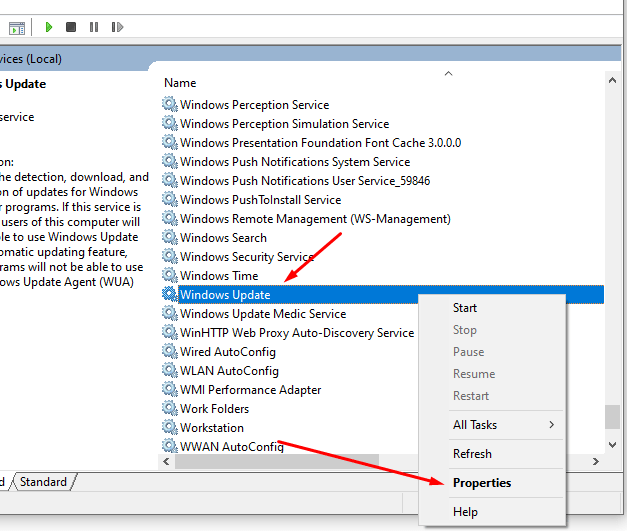
- Set the startup type to manual and then click Start.
- Finally, click Apply and then Ok. Also, make sure that that service status is running.
Fix 2: By restarting the Windows update service
- Open the Run window by clicking Windows + R key.
- Type the command services.msc to open the Service Manager.
- Try to locate the Windows update service and right-click on it.
- Finally, click Restart and you are good to go.
Also Read: Fix Microsoft Compatibility Telemetry High Disk Usage in Windows 10
Fix 3: By re-registering Windows update files
- In the Windows search bar try to find a command prompt and then right-click on it.
- Next, choose Run as administrator
- Type the command as given below and hit Enter after each line of command.
- After entering the command, restart the system and you are good to go.
- regsvr32 wuapi.dll
- regsvr32 wuaeng.dll
- regsvr32 wups.dll
- regsvr32 wuweb.dll
- regsvr32 wucltux.dll
Also Read: Fix Clock Watchdog Timeout Error in Windows 11 & 10
Fix 4: By updating the Intel Rapid Storage Technology driver
You can also try to update the Intel Rapid Storage Technology driver to resolve the issue.
Fix 5: By running Windows update troubleshooter
- Hit the start button and then go to the Settings page
- Next, go to Updates & Security and then to Troubleshoot tab
- Choose Windows update troubleshooter
- Run it and it might resolve the issue
How do I fix the windows update service not running?
Windows update service not running is a common issue faced by Windows users and it can be resolved by opting the approaches as mentioned above.
Windows update service not running you may need to restart
Sometimes the Windows update service issue can be caused due to corrupted windows update history files. Here’s how you can resolve the issue of Windows update service not running you may need to restart…
Solution:
- Firstly hold down the Win + R key.
- Next, type the command services.msc.
- Now click Ok and then open Services snap-in.
- Open the Background Intelligent Transfer Service.
- Simply make sure the startup type is set to Automatic.
- Then click the Start button. And click Ok and close the window.
- You need to double-click Windows update.
- Finally, close the services snap-in, and reboot your system. It must resolve the issue for sure.
Windows update cannot currently check for updates
Solution:
- Head to Administrative Tools/Services and stop the Windows update service.
- Next, go to folder C:\Windows\ Software Distribution and remove all the files & folders.
- Now manually run the Update Service and it must resolve the issue for sure.
No windows update in services.msc
Step 1: First of all hold down Win + R key which will open the Run window.
Step 2: Next type the command services.msc and hit Enter to open the service manager.
Step 3: Now find the Windows Update service, right-click on it choose Restart.

Step 4: Restart the system and then you are good to go.
That’s for this article. If still you are unable to update your Windows 10 and facing Windows Update Service Not Working error then comment below. We will personally help you.