BSOD stands for Blue Screen of Death errors it is a common problem among Windows 10 users. When it happens your screen turns in to blue and shows “Your PC ran into a problem and needs to restart… error: CRITICAL_STRUCTURE_CORRUPTION“ Massage. It happens when the hardware or software fails. Due to some incompatible applications, this error can take place. When the hardware and software fail at the same time, It causes this error. This can cause the whole system to crash down and show you the blue screen of death. If you are facing this problem then you don’t need to worry about it. We will help you to solve this problem and we will tell you what can cause this problem.
What Causes Critical Structure Corruption?
System crashed:- Sometime it happens when your system is crashed.
Hardware:- hardware problems can also cause this problem. There are three major parts of hardware that can affect this problem which are RAM, HDD, POWER SUPPLY.
Software:- it can also happen when your software occurs error.
DIMS:- DISM stands for Deployment Image and Servicing Management it is known for the higher reach. It can also repair critical structure corruption.
Blue screen Troubleshoot:- is used for usual problems. For Windows 10 users Microsoft provides this service after the creator’s update. Troubleshoot find the problem which causes Blue screen then it solve it.
SFC:- SFC stands for system file checker it is the best method for solving critical structure corruption. This tool is run by Commands. The most important and the basic work of SFC IS finding problems of the system and trying to fix them.
Delete the third party:- this is the biggest and it can be the most critical calls of critical structure corruption. Most of the time in uses download third-party apps like free antivirus, antivirus solutions, GPU and CPU overclocking software, drive software, automatic driver updater and many more this kind of software can create Blue screen problem (critical structure corruption). Don’t download the third party cheap software for your system always download authorized software.
Clean and install a new window:- at the last if all the things are not working then you have to clean your window and you have to install a new window. Before installing a new window we will suggest you backup your data. every thinks will be deleted after installation of new windows
How Do I Fix Windows 10 Critical Process Died?
You can easily solve this Critical Structure Corruption Error. This BSOD error is one of the most irritating error because of this error your Windows keeps rebooting. So you have to fix this error.
Method 1- Run Blue Screen Troubleshoot
Step 1:- Press Windows + I for an open setting.
Step 2:- Click on update and security.
Step 3:- now select troubleshoot which is situated in the left pane.
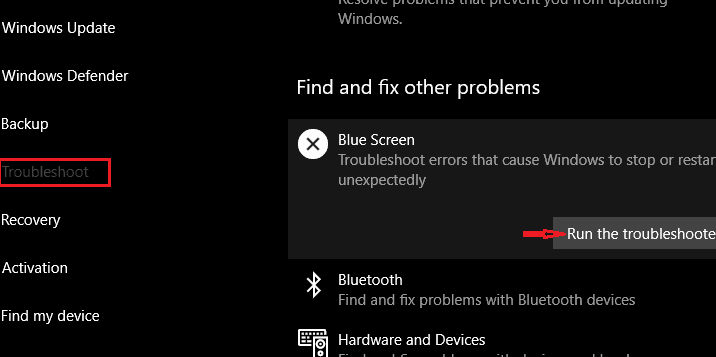
Step 4:- Find blue screen.
Step 5:- Now click on the Run this troubleshooter button.
Step 6:- wait for the finish.
It can solve critical structure corruption errors.
Method 2- Check RAM status
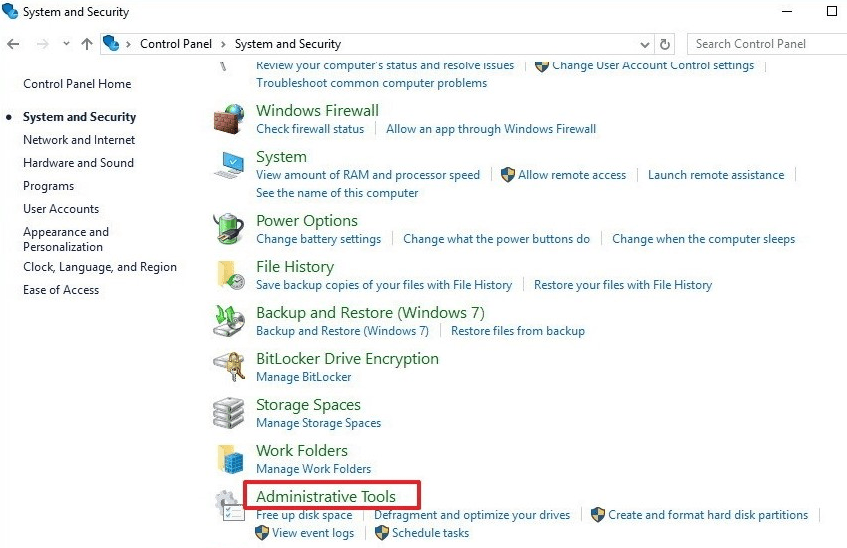
Step 1:- Click on the windows button.
Step 2:- type control panel in the search bar.
Step 3:- Open control panel.
Step 4:- select system and security.
Step 5:- click on the administrative tool.
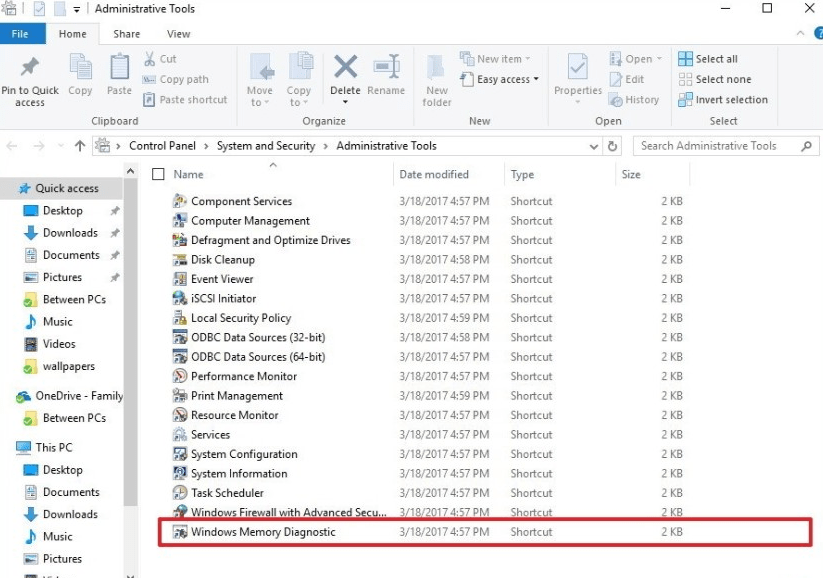
Step 6:- now administrative tool windows appear in your screen.
Step 7:- find windows memory diagnostic.
Step 8:- Now click on Restart now and check the problem.
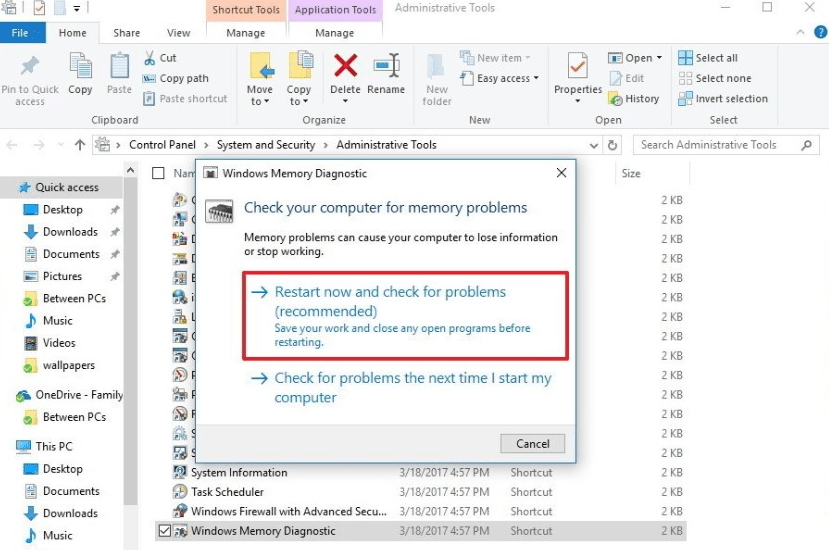
Step 9:- now your computer is rebooting.
Step 10:- your computer is diagnosed in standard mode. ( you can change your diagnostic mode by pressing F1.)
Step 11:- now you have to disable catch.
Step 12:- When everything is done then press f12.
Step 13:- after memory diagnostic is done check it’s status.
For check status follow these steps:-
Step 1:- Open start.
Step 2:- Search eventvwr.exe.
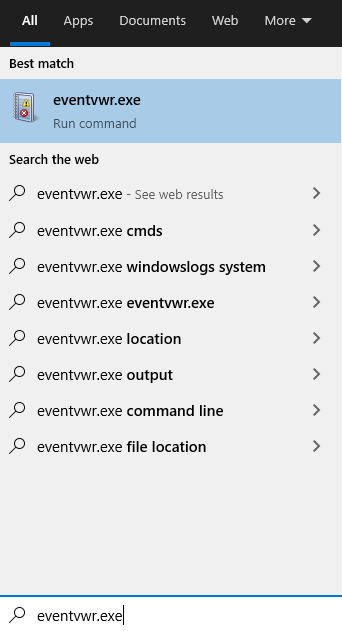
Step 3:- press enter for open event viewer.
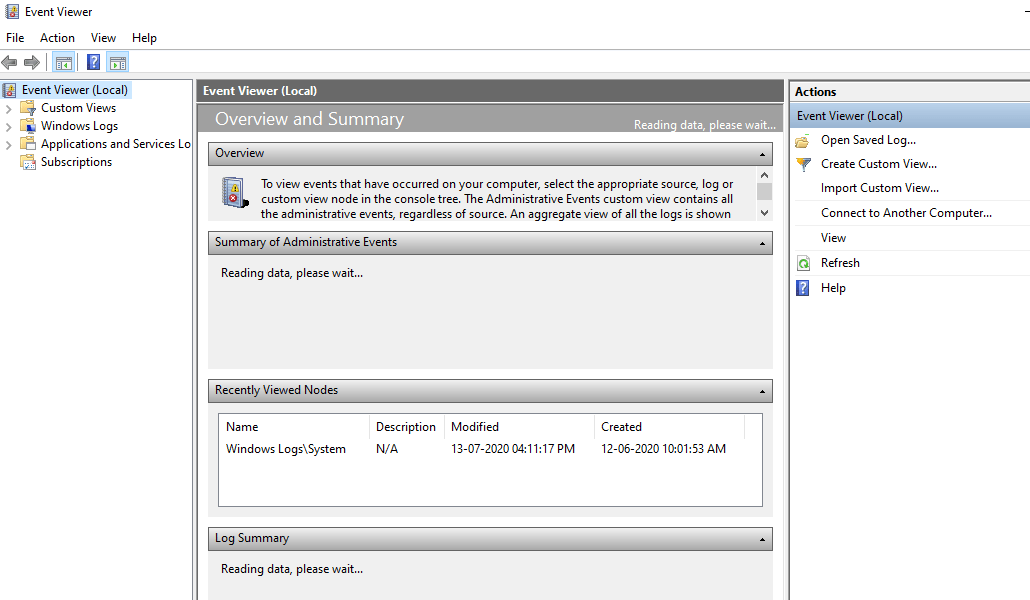
Step 4:- now double click on windows log folder which is situated in the left pane.
Step 5:- right-click on the system.
Step 6:- Click on find.
Step 7:- Type MemoryDiagnostics-Results.
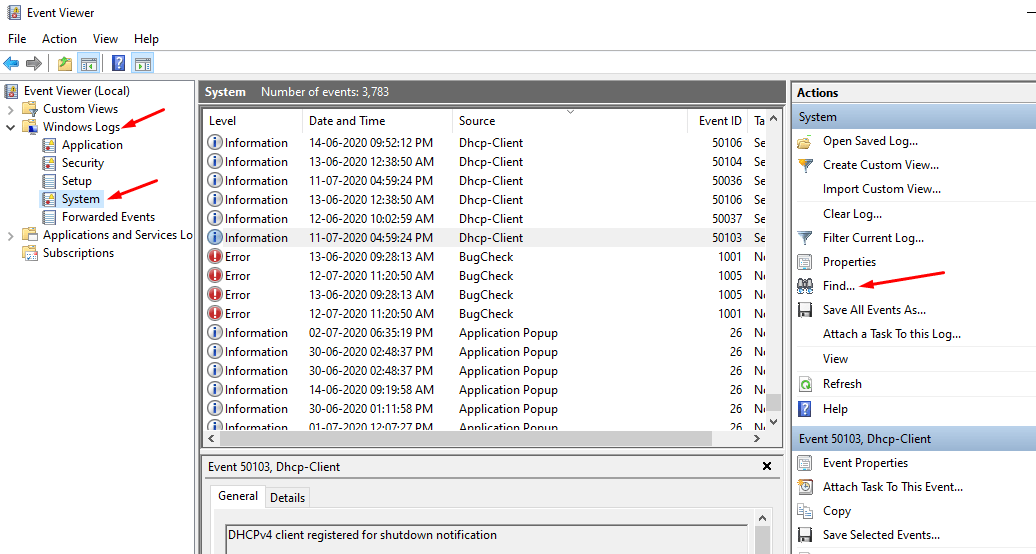
Step 8:- Click on Find Next button.
Step 9:- close find dialogue.
Step 10:- double-click the MemoryDiagnostics-Results on event viewer. To read the result.
Step 11:- if the result shows “The Windows Memory Diagnostic tested the computer’s memory and detected no errors.
Step 12:- in case if something is wrong or not, then remove your RAM one by one and look for the problem.
Method 3- HDD
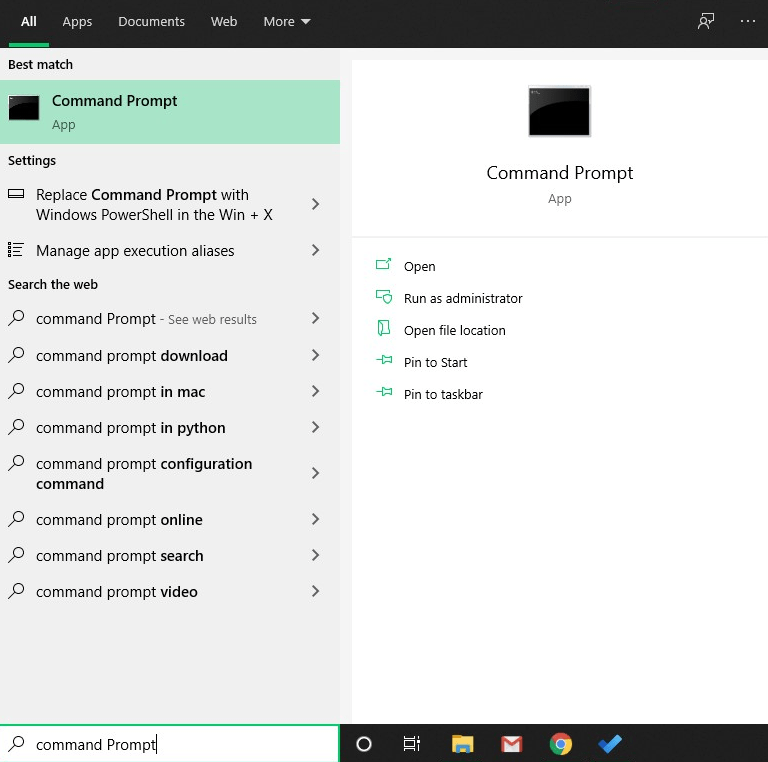
Step 1:- Open command prompt.
Step 2:- type: chkdsk c: /r
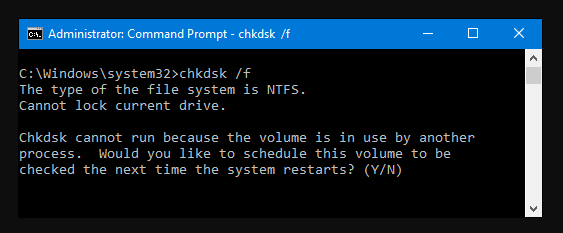
Step 3:- Press enter.
Step 4:- this can find errors of HDD.
Method 4- PSU (Power supply unit)
Step 1:- Check all cables connectivity.
Step 2:- if there is something wrong then solve it.
Method 5- DISM
Step 1:- Click on the Start button.
Step 2:- find the command prompt and open it.
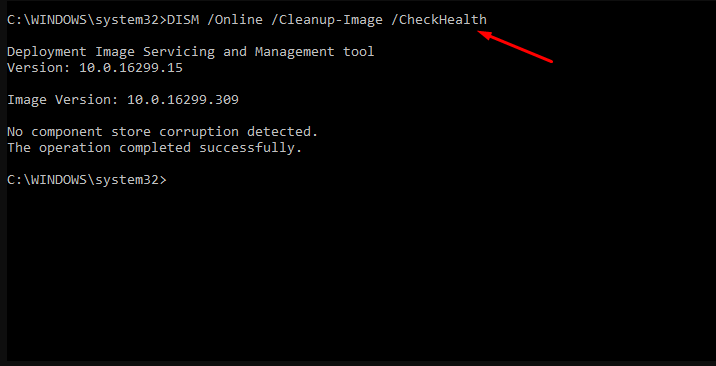
Step 5:- type command DISM /Online /Cleanup-Image /CheckHealth press enter after each.
Step 4:- wait for the scanning
Step 5:- After scanning done close command prompt
Step 6:- Restart your PC.
Method 6- SFC
Step 1:- Click on the Start button.
Step 2:- find the command prompt.

Step 3:- type command sfc/scannow
Step 4:- Press enter.
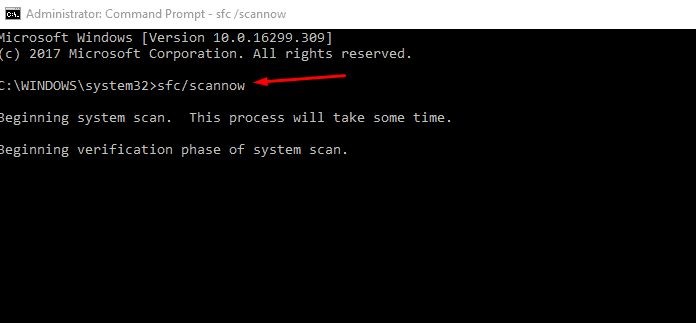
Step 5:- wait for the scan.
Step 6:- When everything is done then close command prompt.
Recommended: How To Flush DNS in Windows 10
Method 7- Window Installation
Step 1:- download window installation medium from Microsoft official site.
Step 2:- Build it windows installation USB thumb drive you can also select DVD.
Step 3:- boot your system by windows installation medium.
Step 4:- now a windows setup box appears in your screen.
Step 5:- Select your date and time format and language.
Step 6:- Now click on next.
Step 7:- press install.
Step 8:- now it will ask you a product key.
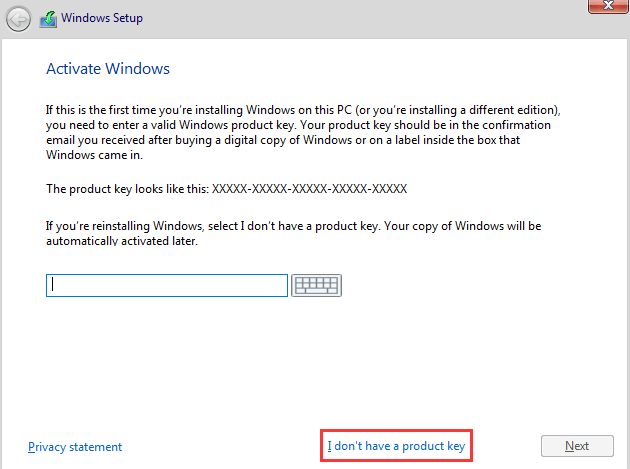
Step 9:- if you have your product key then type and press enter (if you don’t have a product key then click on I don’t have product key)
Step 10:- select a properly operating system.
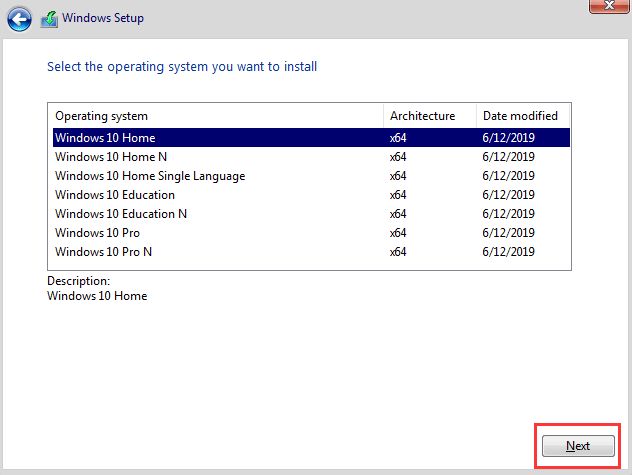
Step 11:- then click on next.
Step 12:- check I accept the license term.
Step 13:- press next.
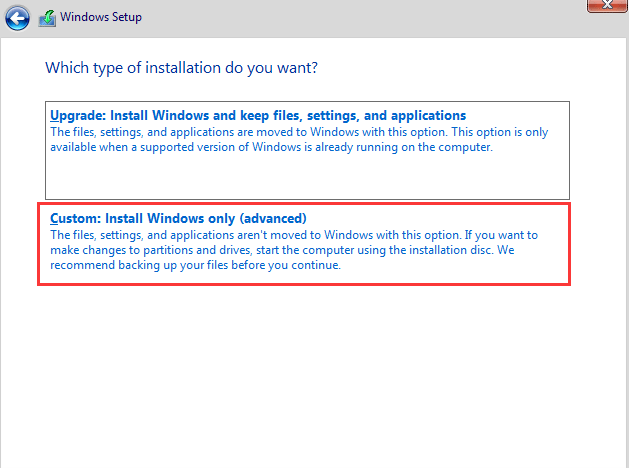
Step 14:- Select Custom: Install Windows only (Advanced).
Step 15:- select a drive to install windows 10 (generally it is drive 0)
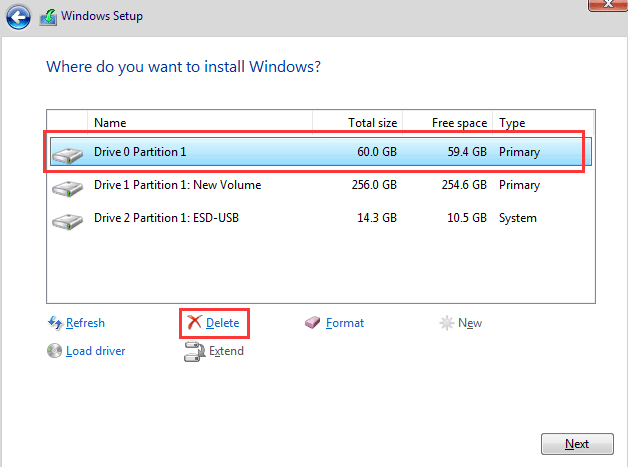
Step 16:- then click delete to remove it.
Step 17:- press ok.
Step 18:- Now select an empty partition and you can start new Windows 10 installation.