WiFi is a technology that has become a vital part of our day to day needs of Internet browsing. Most of us are dependent on this technology in one way or another. Today, we have plenty of methods to use WiFi. Our Wifi router, by default, comes up with a network name and a password along with it.
The network name is displayed whenever we try to connect our device to WiFi. If our network is password protected, we are prompted to enter the password before connection. After the successful entry of a password, we can connect to it and browse the Internet to do much more.
Today we are going to discuss how to change the WiFi name or password. It is an excellent practice to keep changing your WiFi password so that nobody can connect to it without your permission. People like to change their Wifi name to something more catchy or personalized.
What is WiFi?
WiFi or Wireless Fidelity is a technology that allows users to access wireless internet connection via wireless internet router. NCR Corporation/AT&T invented it in 1991 in the Netherlands. It is also commonly known as Wireless LAN and can be used in the local area network wirelessly.
Why change WiFi Name and Password?
Why does it require to change the WiFi name and password? The WiFi router comes up with a default name and password, which can be the same all akin models. If the name and password are not changed, it can be easily guessed by network hackers.
To enhance the privacy & security of your network, it is required to change its name and password. In this way, none can make use of your WiFi connection without your permission. Try to choose the name and password as personalized as possible.
How to Change the WiFi Name?
Every router provides a web interface that can be used by registered users to access router settings. To change the WiFi name, follow these steps.
- At first, open your web browser and go to the router’s web interface, i.e., the official website or web interface provided by your router.
- Login to your router and look for WiFi Settings or Wireless Networks.
- Now look for SSID or Network name.
- Next, go to the Network name text-box and remove the name displayed.
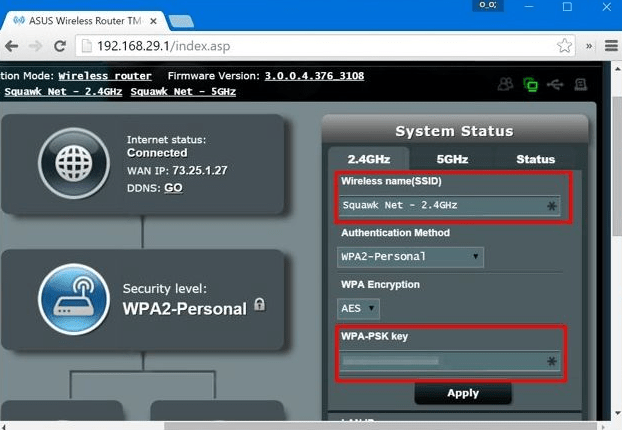
- In place of it, enter the desired network name.
- Hit Apply to save the changes.
- Now next time you try to connect to your WiFi network, you will find the spot it’s changed the name.
Recommended: How to View Saved Wi-Fi Passwords on Windows 10
How to change the WiFi Password?
If you are willing to change the WiFi Password, follow the steps given below.
- Firstly, open your web browser and go to the router’s web interface, i.e., the official website or web interface provided by your router.
- Login to your router and look for WiFi Settings or Wireless Networks.
- Go to the WPA-PSK key and change the password. Just make sure the password is not too easy to guess or not too complicated for you to remember.
- Always remember your new password before changing it.
- Once entered, hit Apply to save changes.
You have to log in to the router admin panel to access the WiFi password panel. You can use 192.168.1.1 or 192.168.0.1 IP address to access Router panel. If you are changing the password for the first time then you can use default username and password which are admin or password.
Thanks for reading this guide.